Showing posts with label home improvement. Show all posts

Thursday, February 14, 2013

Cottage Color

Growing up in Maine, summers were a precious commodity.  Every spare second was spent out at camp - about 15 minutes away on a small pond.  My grandparents had an old cottage there that has since been replaced by my parents' modern house, but I vividly remember the colors of the old camp.  Everything was a cast-off from somewhere else, usually covered in a hand-crocheted afghan, an explosion of mismatched colors that somehow all coordinated. 

A few years ago, I found Maine Cottage in a magazine, and have been hooked on their colors and furniture and fabric ever since.  Of course, nobody who actually lives in Maine can afford them, but still, it's nice to look.  And it all reminds me somehow of the old camp.  Worn out wicker, creaky wooden chairs, painted furniture.  All put together with a glass of lemonade on a warm summer's afternoon. I mean, who wouldn't want to live here?

 {via}

 {via}

{via}

So, when I inherited a small side table from my mom's friend, I decided to try and give it a 'maine cottage' look.  I had the local paint store color-match a swatch I printed out from online and went for it.  This is the look I wanted...


 ...and this is the table before. 


Cute, but water-stained and had seen better days.  So I bundled up and took it outside for a good sanding.  I knew I would paint the legs, so I didn't bother with them (phew!).  The top was a different story. I wanted to get to the original wood and then do a paste-wax finish.   I sanded for about half an hour just to get all the water-marks out, and then spent another half hour on the curved sides and drop-leaf joints.  My hands were numb by the end.  Not really a project for the dead of winter in Maine. 


 Close enough.  Then came the fun part - staining, sanding, and then a coat of smelly paste-wax. 


(Note the super-professional Nylabone prop.  Because that's how we roll in this house.  Whatever is handy...)


I didn't prime, so it took a couple coats.  But I was inside, toasty by the fire, so it was okay.  Here's the before-and-after.  Not exactly Maine Cottage, but it cost me $3.00 in supplies (sample jar of paint).  Whee!

What do you think?

Tuesday, November 20, 2012

Swingin' Seventies Kitchen Remodel, Part IV

While we were in Italy, the cabinets and countertops went in!  The Santa Cecelia granite looks amazing - I was worried that it might look too "granite countertops and stainless steel appliances", but it is a really interesting piece of stone.


The counter came with a special offer free surface-mount stainless sink, but we decided to purchase a white undermount and have then cut the opening for that instead.  The backside of the cabinets that make up the bar is covered with a sheet of faux beadboard panelling (painted the same white - Billowing Clouds from Behr - as the cabinets)

 Almost there...


all photos, ours

Tuesday, October 23, 2012

Swingin' Seventies Kitchen Reno, Part III

The Floors.  They took a solid week.  But so, so worth it.  We found the tile for $1.79 a square foot at a discount store and snapped it up.  It was what we wanted - faux-bois in a dark color, nice texture, and durable.  

But, as we couldn't tile over the existing plywood (and be guaranteed a good seal), we put Durock down with lots and lots of mastic and screws.  
 

It was not a tough job (those sheets are pretty large), and it looked much nicer and cleaner already.  Plus, we had the added security of knowing the subfloor was one solid mass.


After 24 hours of drying time, everything not tied down got a coat of paint.  2 coats, actually.  

Here it is, complete!  Cutting in that back wall was a pain in the ass, but it looks really good.  Very Tuscany-ish.  In fact, whenever we found a spot where the skim-coat wasn't quite smooth, someone would shout out "STUCCO!"


 And then...then we tiled.  Or I should say my dad and Michael tiled.  I wasn't feeling well, so after a coat of paint on the cabinet doors, I gathered Ollie and went home.


The trick, I am told, was getting the lines perfectly straight.  The room is 24 feet long.  What do you think?  Straight enough?


The next day, feeling much improved, I got to participate in my favorite part of tiling: picking the spacers out.  I love those damn things.  It's really satisfying, because when your floor is clear, it looks somehow Real and Finished.


And they make cute abstract art.


We were a little short on tiles, so we had to make a run to the store...aaaand they were out of our tile.  Of course.  We bought a case of another color and called it good. Michael knew he was short the night before, and he planned it out so the space would be under the cabinets. 


Chocolate ice cream?  Baby poo?  I think not!  It is grout!  Everyone's FAVORITE PART of a tile job.


Here's the thing.  Grout is not super difficult, just time consuming.  You have to make sure you get it right.  Otherwise, you will be going over it again, and after spending so much intimate time with the floor on your hands and knees (ahem.), NOBODY wants to do that.  So go over it on an angle once...


See where there is a gap? The grout caught on the edge of the tile in the direction you pushed the float.

Now bring the float back, and you have a lovely seam.  

So do that for every freaking joint in your floor, and you end up with this.  Perfect drying grout and nasty, hazy tiles.  This haze will be the bane of your existence.  You will wash the floor 3, 4, maybe 5 times. 


You will steam-mop the floor 3 times.  You will curse like a sailor.  


 Eventually, you get on your hands and knees again and buff the floor with an old towel until you think it is Good Enough because the Patriots are going to be on TV in a hour and you need to stop and get beer on the way home. 


A note on the paint colors.  I didn't write a post about the painting because it all happened so quickly, I didn't take any pictures.  We went with Benjamin Moore...Colonial Red and Rich Cream.  There is a a large brick hearth facing the kitchen, so I wanted to mirror that on the back wall of the dining room.  This red was just right - brick-like without being obnoxiously red.  The rich cream was a nice neutral with just the faintest hint of yellow.  Perfect for creating an illusion of warmth up on cold winter mornings.


Next up, cabinet install.  Almost there!


all photos, ours

Monday, October 15, 2012

Swingin Seventies Kitchen Reno, Part II

Day number 3 at the house saw us painting and sheetrocking.  A lot.  The kitchen walls needed boarding and we installed cementboard where there will eventually be backsplash.  The old dining room walls needed a skimcoat.  Or a thick-coat, as it turned out.  And the cabinet hardware needed some intervention. 

Here's the old hardware - big scrolly colonial-looking things went on the drawers, and knobs went on everything else.  I thought about reusing them, but here's the thing about knobs.  They need to be comfortable.  These knobs had hollow backs, so every time you put your grubby little paws around them, the edges sank into your fingers.  Great if you want some aversive pain stimulus to thwart your midnight snacking, not-so-great if you just want to freaking open a cupboard already.


The hinges, however...the hinges we will reuse.  Hinges are MAD expensive!  

After a couple light coats of Rustoleum Oil-Rubbed Bronze, they are not bad.  They have a kind of French Country look to them, right?  Yes?


So here is it.  Old, strange-colored brass hardware out, matte oil-rubbed bronze in.


Next up, painting cabinets.  I am ridiculously anal about painting things, and wanted these to have a shiny-smooth factory finish.  We used Behr Porch and Patio paint in a high-gloss finish and went with a warm white (billowing clouds) to brighten things up while not making things seems too stark. I wanted to spray them, but the paint was too thick and kept gumming up the sprayers, so I bought a plain old foam roller and went for it.  I rolled the whole door and then went over it in very light, even strokes before setting it aside to dry.


A note to any future cabinet-painters.  Don't forget to paint the bottoms of your uppers.  We remembered this at the very end of Day 3, and thank god we did, because Michelangelo I am not, and painting them in place would have SUCKED.


Meanwhile, back inside, my dad and his friend were installing the new can lights.  The old kitchen was so dark, we wanted as much light as possible, so this was an easy solution.  
Once the sheetrock was up, we could really see the difference.  And by the way.  The new, 'ultralight' sheetrock?  The one emblazoned with text about how light it is and how you can check out the difference at theweighthasbeenlifted.com? Still heavy as hell.   (I didn't check out their website - if anyone does, let me know.  I anticipate it is all sorts of Amazing and Awesome.)

But.  There always seems to be a 'but' with sheetrock, doesn't there?  But.  There were some unavoidable butt-end seams, one on the ceiling, and two on the walls where the edges met the old dining room walls.  These seams were to be the bane of my dad's and Michael's existence for the next week.  Much, much joint compound was used in the crafting of these walls.
  
Here she is, all boarded and compounded, and set out to dry.  


It begins to look like a real, live room.


(I'm also playing around with a watermark for the blog.  Not sure how I feel about it yet, but there you go.)

Happy Monday!

all photos, mine

Wednesday, October 10, 2012

Swingin' Seventies Kitchen Reno, Part 1

I have a blisters on my fingers.  And not in a cool Ringo Starr way.

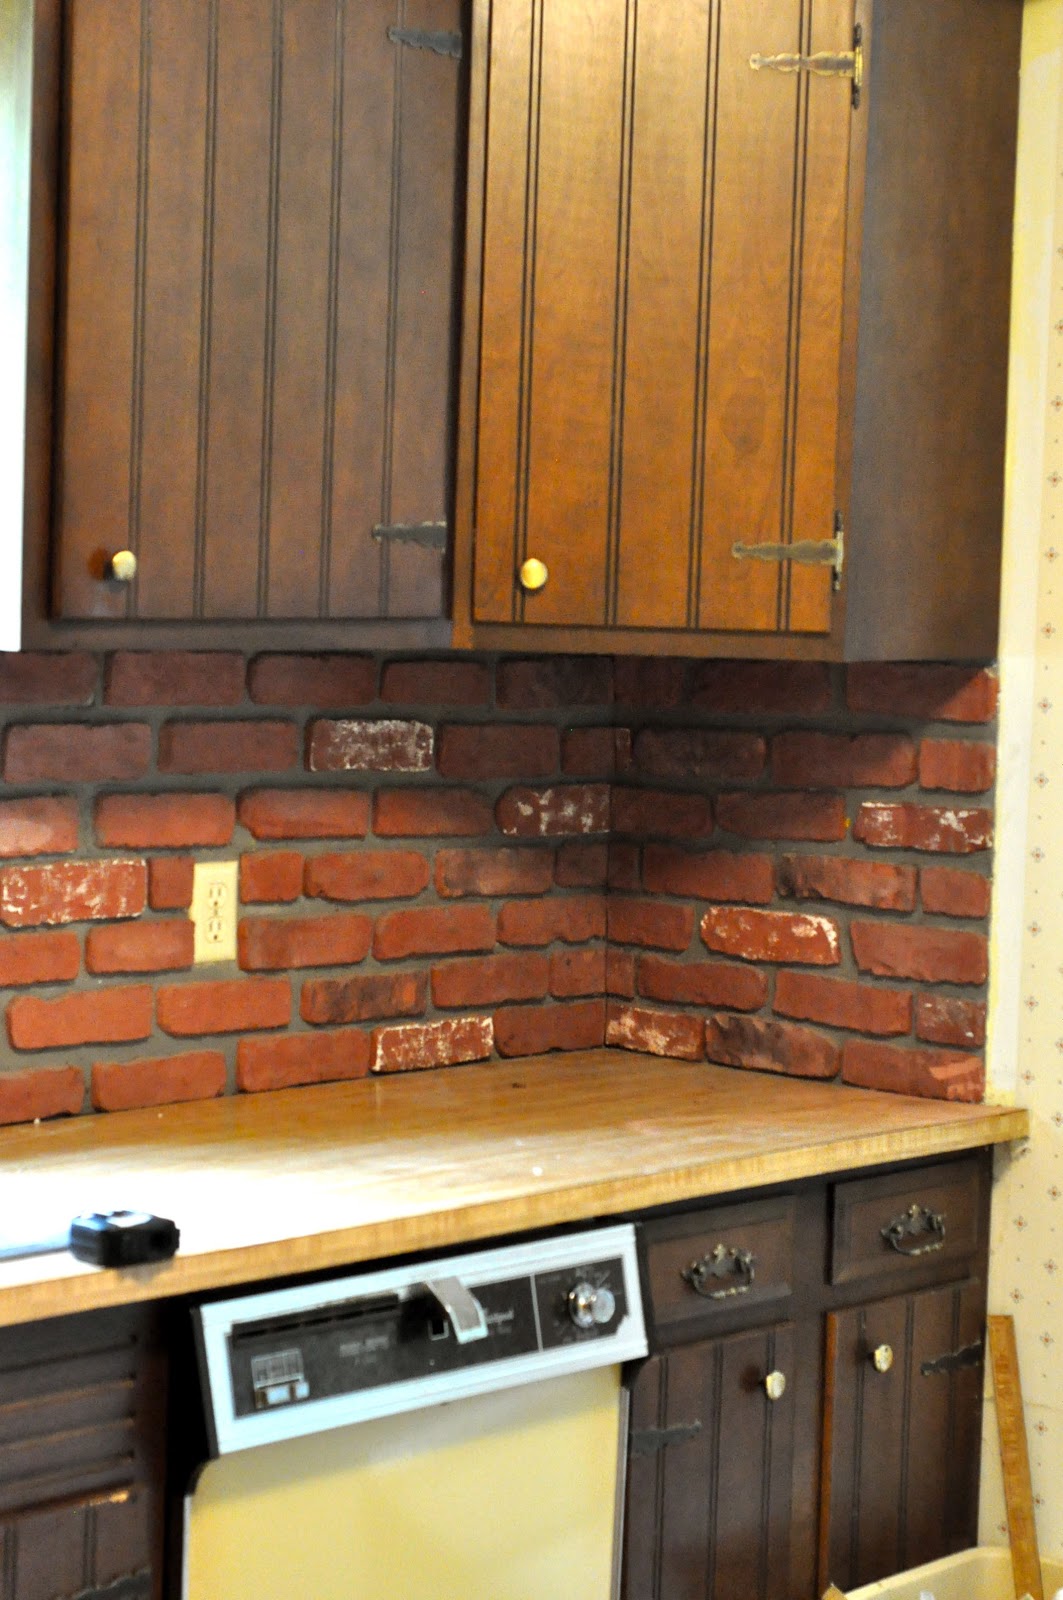
It was an EPIC weekend of demo, sheetrock and wallpaper guts. I absolutely hate change, especially where my childhood home is concerned.  But no amount of mushy nostalgia for that dark, dreary hot mess of a kitchen/dining room could overcome the fact that it was Ugly and Dated.  And since my parents WILL sell that house someday, I assume they won't want buyers running screaming from the faux butcherblock/brick/tile/harvest gold crazy.

So.  Here's where we begin.  My dad had already started demo by the time I got there, and after I lost my shit and hissed "But I need before pictures!  This is going to be such a TRANSFORMATION! what do you MEAN you already tore the dishwasher out?!", I shoved the thing back in there and snapped away.

Here she is, in all her glory. 


 A nice look at the "brick" and the "butcherblock".  The cabinets are okay, and in decent shape for 30 years old.  


 The doors came off pretty easily, and thankfully, the metal straps on the front were not attached to the hinges, so we could recycle instead of buying new.  Hinges are SUPER pricey! 


Cabinets out and the wall is coming down.  What in God's name is that glow through the doorway, you ask?


Why it's the dining room wallpaper!


Let 's take a closer look, shall we? Bet you had no idea grapevines also grew kumquats and strange orange buttercups, did ya?  Ha!  Live and learn...


The wall is down, and instantly, the room looks AMAZINGLY huge.


Next morning...time to wash some cabinets.


And sand some cabinets.  (After half an hour with my trusty new-to-me vintage sander, I felt as though I had gone 12 rounds with one of those as-seen-on-tv shake weights.  Must have been good for at LEAST 200 calories, am I right?)


Then some oil-based Kilz we had left over from the house remodel.  The cabinets soaked it up almost instantly.


 Meanwhile, back inside...the wallpaper is coming down.  This job was the most ridiculous, giant pain in the ass ever.  Wallpaper is a b-word.  My mom spent a good 16 hours peeling that shit off the walls. 


And this is what the walls looked like afterwards.  Not great, but not anything a little joint compound won't fix.

 And the AMAZING dishwasher? 


 Probably still by the side of the road. 


all photos, ours
Related Posts Plugin for WordPress, Blogger...